


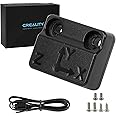
Creality Ender-3 V3 KE G-Sensor ADXL345 Vibration Compensation Sensor for Ender-3 V3 KE 3D Printer, Precise Sensing Control, Reduces Ringing for High-Quality 3D Printing

Description
🎨 Print Like a Pro, Vibration-Free!
- RING OUT THE NOISE - Smart resonance compensation slashes ringing marks, elevating surface finish quality.
- BOOST YOUR PRINT IQ - Syncs with Creality OS to dynamically optimize printing parameters in real time.
- PRECISION PERFECTED - ADXL345 sensor detects X/Y axis vibrations with pinpoint accuracy for flawless prints.
- SEAMLESS INTEGRATION - Effortless plug-and-play setup tailored exclusively for Ender-3 V3 KE printers.
- UPGRADE YOUR MAKER GAME - A must-have mod for pros craving consistent, museum-quality 3D prints every time.
The Creality Ender-3 V3 KE G-Sensor ADXL345 is a precision vibration compensation sensor designed specifically for the Ender-3 V3 KE 3D printer. It accurately measures X and Y axis ringing frequencies and feeds resonance compensation data into Creality OS, significantly reducing ringing artifacts and improving print surface quality. Lightweight and easy to install, this sensor is essential for users seeking professional-grade 3D printing results.
Specifications
| Manufacturer | Creality 3D |
| Part number | CXGJX-P-V3KE-VC |
| Item Weight | 90 g |
| Package Dimensions | 15.3 x 11.7 x 4.4 cm; 90 g |
| Manufacturer reference | CXGJX-P-V3KE-VC |
| Colour | Ender 3 V3 KE G-Sensor ADXL345 |
| Included components | 3 V3 KE Vibration Compensation Sensor |
| Batteries included? | No |
| Batteries Required? | No |
Reviews
L**Y
Makes bed levelling a breeze.
Easy to fit on an Ender 3. Be aware though, that unless you have a Creality controller board, you will need to verify the pin outs before connecting. Also be aware that the pin-outs may not be the same as a BL-Touch. My board (SKR mini e3 v1.2) does not have a 5 pin connector for a probe so I had to de-pin the connector to split it into a 2 and 3. Once fitted and with offsets calculated, and firmware re-flashed, it’s very easy to use. Improved print quality as you can level the bed as often as you like. Good value, durable little probe.
P**S
Excellent bit of kit
I have an Ender-5 Pro and, unfortunately, I had issues with the bed being uneven or warped - something I'm sure a lot of Creality Ender owners have seen (especially the older models). I first bought the Glass bed to see if this would help, and whilst it did make a bit of a difference, it didn't fix the issue fully.Buying this CRTouch was the best thing I could have done, the installation can sometimes be a bit finicky as I had to download Firmware from the Creality website and edit the file (I searched online for the issue I was seeing, it seemed to be somewhat common). However, installing the CRTouch hardware was easily done.At the end of all this, you still level the bed manually to the best of your ability, and then the CRTouch takes over the rest by probing points of the bed and noting the warping - my prints are much better now!
A**B
Great product.
Easy to install and set up. Makes printing so much easier
S**N
Works exactly as hoped
After years of manually levelling, printing "1st layer tests" and live adjusting almost every other print, I finally decided to save myself the headache and just get one of these. If you know how to custom build Marlin I'd advise enabling a bunch of other features such as the tramming wizard and the z-probe wizard, which are absolute gamechangers. You still need to tram your bed somewhat level every now and then, and you're going to have to configure a bunch of custom options relating to the probe position. You can also use the pre-built Creality firmware but as I didn't do that, I can't speak to it's accuracy - latest info I have on these says they don't include the optional features above (but perhaps they do, now). Very impressed.
K**S
good product, needs better instructions.
Got this to upgrade my ender 5 to auto level the bed. Used this along side Klipper and a few other components. A bit of a pain to program as there is not many guides but i got it working and it is great. a lot less print fails now.
M**S
Thought this was supposed to be plug and play compared to the BL touch.
All fits perfectly as it should on the ender 5 pro.Now come the software issues! I updated my boards (4.2.2) firmware from stock.Z axis only went down after removing z stop switch could not get it to go up. Every video online (and i watched loads of them) and in the book shows prepare in the menu option, I didn't have that all I got was move and no bed leveling anywhere. Double checked and reflashed the firmware and imflashed the cr touch firmware.. Every video of installation for the ender 5 shows marlin software that I didn't have.After 6 hours it was either put in the bin or send it back, Then I resorted to installing any firmware for my board in hope something will work.. one update changed all the language on the printer to Chinese, that was fun.When I eventually found one that had the Bed leveling in the option it worked. Thank god..Put a test print on and boom another problem the extruder is now running backwards WTF.. again back to the online forums for help, only option is to change the 4 wires on the extruder (totally reverse the order 1234-4321)!! Surely creality would have sorted a software patch of for this by now it's not like it's a brand new bit of tech with teething issues it's over a year old.Other than that it now works like a charm.Prints are slightly better..
N**S
Not a stand alone product.
Physically fitting it was easy but finding the software to run it was a nightmare, it took me a week of research and false trails to finally download the file that got it running and I now have two programmes on my PC that I no longer need. All in all an experience that I did not enjoy, How can a major manufacturer sell something that does not work without software, and then not provide that software? Beggars belief.
D**E
Works great IF you enable everything.
This was easy to instal, especially as I had watched a youtube video right before!If your printer doesn't already have the ability to use a BL/CR touch, You will need to update the firmware! Which is easier than installing the CR-touch!One thing that I had spent hours trying to firgure out! That no one really talks about... I set everything up it and it homed and leveled and printed great.. But it wasn't going up or down using the mesh leveling!You NEED to go into Cura or your slicer of choice and Enable the use of your CR touch!I use Cura, So...Goto, Preferences.. Printers.. Select your printer, Then click Machine settings.Bottom right you will see a window "Start G-code"In that window scroll down untill you see "G28 ;Home"Click there and press enter to make a new line underneath it.Then type... "M420 S1" ... NO "" marks.Then click the X and close the windowAfter setting everything up on your printer, Adding that M420 S1, Everytime you slice your model it will tell your printer to use your auto mesh bed leveling.THEN......... Everything works great!
Common Questions
Trustpilot
1 day ago
2 months ago
